Category Archives: water heater maintenance

No Hot Water Coming Out of the Shower

a man getting no hot water in the shower.

Reasons Why There May Be No Hot Water Coming Out of the Shower

Imagine stepping into the shower, ready to relax and enjoy a warm, soothing stream of water, only to be greeted by an icy cold surprise. It can be incredibly frustrating when there is no hot water coming out of the shower, especially during the chilly winter months. If you find yourself in this situation, fear not. In this article, we will explore the various reasons behind this issue and discuss potential solutions.

1. Malfunctioning Water Heater

One of the most common causes of no hot water in the shower is a malfunctioning water heater. If your water heater is not functioning properly, it may not be able to heat the water to the desired temperature. There could be several reasons why your water heater is not working:

  • Thermostat Issues: The thermostat controls the temperature of the water. If it is set too low or is faulty, it can lead to insufficient hot water.
  • Heating Element Problems: Electric water heaters have heating elements that heat the water. If these elements are faulty or burned out, they may need to be replaced.
  • Sediment Buildup: Over time, sediment can accumulate at the bottom of the water heater tank, reducing its efficiency and ability to heat water. Regular maintenance and flushing can help prevent this issue.
  • Gas Supply Issues: If you have a gas water heater, ensure that the gas supply is turned on and functioning correctly.

If you suspect that your water heater is the culprit, it is advisable to contact a professional plumber or a technician who specializes in water heater repairs to diagnose and fix the issue.

2. Water Heater Size

The size of your water heater plays a crucial role in determining the amount of hot water available. If your water heater is too small for your household’s needs, it may struggle to meet the hot water demand, resulting in insufficient hot water in the shower. Consider the number of people in your home and their hot water usage patterns. If your water heater size is inadequate, upgrading to a larger capacity unit might be necessary.

3. Plumbing Issues

Problems within the plumbing system can also lead to a lack of warm enough water in the shower. Several plumbing-related factors can cause this issue:

  • Blocked Hot Water Pipes: Mineral deposits, rust, or other debris can accumulate in the hot water pipes over time, obstructing the flow of hot water. Flushing the pipes or seeking professional pipe cleaning services can help resolve this issue.
  • Pressure Imbalance: If there is a significant pressure imbalance between the hot and cold water pipes, it can result in insufficient hot water reaching the shower. A plumber can adjust the pressure balancing valve to rectify this problem.
  • Faulty Mixing Valve: The mixing valve in the shower controls the proportion of hot and cold water. If it is malfunctioning or incorrectly set, it may prevent hot water from flowing properly. A plumber can inspect and repair or replace the mixing valve, if necessary.

If you suspect that the plumbing system is causing the lack of warm water in your shower, it is recommended to consult a professional plumber to assess and resolve the issue.

4. Water Supply Issues

Issues with the water supply itself can potentially disrupt the hot water flow to your shower. Consider the following scenarios:

  • Water Heater Maintenance: If your water heater has not been properly maintained, it may lead to problems in providing sufficient hot water. Regular maintenance, such as flushing and descaling, can help improve the performance of the water heater.
  • Water Supply Interruptions: Check if there are any ongoing water supply interruptions or repairs in your area that could be affecting the hot water availability. Temporary disruptions can occur due to maintenance work or plumbing repairs in the neighborhood.
  • Water Leaks: Hidden water leaks can reduce water pressure, affecting the flow of hot water to your shower. Inspect your plumbing system for any signs of leaks and address them promptly.

If you suspect that the problem lies with the water supply, it may be beneficial to contact your water utility company or a plumbing professional to investigate and resolve the issue.

5. Other Considerations

While the reasons mentioned above are common causes of not hot enough water coming out of the shower, there can be other factors at play. Evaluate the following:

  • Seasonal Temperature Changes: During colder months, the incoming water temperature from the main supply line might be cooler, resulting in a perceived lack of hot water. This is particularly noticeable in areas with colder climates. Adjusting the water heater temperature settings or using a water heater blanket to insulate the unit can help alleviate this issue.
  • Tripped Circuit Breaker: In the case of an electric water heater, check the circuit breaker to ensure it hasn’t tripped. If it has, reset it and monitor if hot water restoration occurs.
  • Age of the Water Heater: Older water heaters may experience more frequent issues and may have reduced efficiency compared to newer models. If your water heater is nearing the end of its lifespan, it might be worth considering a replacement to avoid future problems.

In Summary

Experiencing a lack of hot water in the shower can be a frustrating and inconvenient problem. By understanding the potential causes behind this issue, you can take appropriate measures to resolve it. Whether it is a malfunctioning water heater, plumbing problems, water supply issues, or other considerations, seeking professional assistance can help identify and rectify the root cause of the problem. Remember to consult a qualified plumber or technician, as they are equipped with the knowledge and expertise to diagnose and repair the specific issue affecting your hot water supply. With their assistance, you can once again enjoy a warm, invigorating shower.

Recognizing the Red Flags of a Deteriorating Water Heater

a deteriorating water heater in need of replacement.

The Importance of Recognizing the Red Flags of a Deteriorating Water Heater

A water heater is an essential appliance in any household, providing hot water for various activities such as bathing, cooking, and cleaning. However, like any other mechanical device, water heaters have a limited lifespan and can deteriorate over time. It is crucial for homeowners to recognize the warning signs of a deteriorating water heater to prevent potential disasters, such as leaks or complete system failure.

Understanding How Water Heaters Work

Before we dive into the red flags, let’s take a moment to understand the basic functioning of a water heater. Most residential water heaters rely on a storage tank system, where cold water enters the tank through a supply line. The water is then heated using an electric or gas-powered heating element, depending on the type of water heater. Once the desired temperature is reached, the hot water is ready for use and is delivered to the various taps and fixtures in the house.

Now that we have a basic understanding of how a water heater works, let’s explore the common red flags that may indicate a deteriorating unit.

Inconsistent Water Temperature

One of the earliest signs of a deteriorating water heater is inconsistent water temperature. If you notice that your showers are starting off too hot or too cold, even if you haven’t made any adjustments to the temperature settings, it could be a warning sign. A failing heating element or a malfunctioning thermostat can result in fluctuating water temperatures, making it uncomfortable and inconvenient for daily activities.

Unusual Noises

If your water heater starts making strange sounds, it is definitely a cause for concern. Banging, popping, or rumbling noises coming from the unit can indicate sediment buildup inside the tank. As water heaters age, sediments can accumulate at the bottom of the tank, causing efficiency issues and potentially damaging the heating element. Regular maintenance, such as flushing the tank to remove sediments, can help prevent further deterioration.

a sink shooting out rust colored water.

If you notice a brownish or reddish tint to your hot water, it could indicate corrosion inside the tank.

Discolored or Rusty Water

Another red flag to watch out for is discolored or rusty water coming out of your taps. If you notice a brownish or reddish tint to your hot water, it could indicate corrosion inside the tank. Over time, constant exposure to water can cause the tank to deteriorate, leading to leaks and other issues. Discolored water can also be a sign of a failing anode rod, which is responsible for protecting the tank from corrosion. If you encounter this issue, it is crucial to have your water heater inspected by a professional.

Water Leaks

Water leaks are a clear indication that something is wrong with your water heater. Even a small leak around the unit should not be ignored, as it could be a warning sign of a larger problem. Leaks can occur due to a variety of reasons, such as a faulty pressure valve, a cracked tank, or loose connections. Ignoring leaks can lead to extensive water damage and even pose a safety risk. If you notice any signs of leakage, it is vital to shut off the water supply to the heater immediately and contact a professional plumber.

Age of the Water Heater

While not a direct red flag, the age of your water heater can be a good indicator of its condition. On average, a water heater has a lifespan of around 8 to 12 years. If your unit is approaching or has exceeded this age range, it is more susceptible to deterioration and issues. Regular maintenance becomes even more crucial for older water heaters to ensure their longevity and efficient operation.

Conclusion

Recognizing the red flags of a deteriorating water heater is essential for every homeowner. By staying vigilant and addressing these warning signs promptly, you can prevent costly repairs, damage to your property, and the inconvenience of having no hot water. Remember to consult a professional plumber for proper diagnosis and repairs, as they have the knowledge and expertise to handle water heater issues effectively.

Investing in regular maintenance and periodic inspections can significantly extend the lifespan of your water heater, ensuring a continuous supply of hot water for your everyday needs. Don’t wait for a complete system failure – be proactive in monitoring your water heater and take necessary actions to keep it in optimal condition.

Essential Water Heater Maintenance Tips for Lowering Utility Expenses

a plumber performing water heater maintenance.

Welcome to our comprehensive guide on essential water heater maintenance tips for lowering utility expenses. Maintaining your water heater is not only important for its longevity but also for reducing energy consumption and saving money on your monthly utility bills. In this article, we will cover various maintenance tasks and precautions that will help you optimize the efficiency of your water heater and ultimately lower your utility expenses.

Understanding the Importance of Water Heater Maintenance

Water heaters are one of the most essential appliances in our homes, providing hot water for various daily activities such as bathing, cooking, and cleaning. However, without proper maintenance, they can become less efficient over time, resulting in increased energy consumption and higher utility bills.

Maintaining your water heater ensures that it operates at peak performance, maximizing its energy efficiency and extending its lifespan. By implementing these essential maintenance tips, you can minimize energy waste, reduce the risk of breakdowns, and ultimately save money on your monthly expenses.

Determine the Type of Water Heater

Before diving into the maintenance tips, it’s crucial to identify the type of water heater you have. The most common types include:

  • Conventional storage tank water heaters
  • Tankless water heaters
  • Heat pump water heaters
  • Solar-powered water heaters

Each type may have specific maintenance requirements and considerations, so consult your water heater’s manual or contact a local plumber if you are unsure about its particular needs.

Regularly Check the Temperature and Pressure Relief Valve

The temperature and pressure relief valve is a critical safety feature in your water heater. It prevents excessive pressure buildup and potential explosions. To ensure its proper functionality:

  • Check the valve annually for leakage or signs of corrosion.
  • Activate the valve a few times to make sure it is working correctly.
  • If you notice any issues, such as leaks or faulty operation, contact a professional plumber to repair or replace the valve.
a plumber flushing a water heater.

Flushing and draining the tank at least once a year helps minimize sediment accumulation and prolongs the lifespan of your water heater.

Flush and Drain the Tank Regularly

Sediment and mineral buildup in the tank can negatively impact your water heater’s efficiency, leading to higher energy consumption. Flushing and draining the tank at least once a year helps minimize sediment accumulation and prolongs the lifespan of your water heater. Here’s how to do it:

  • Turn off the power supply to the water heater.
  • Attach a hose to the drain valve located at the bottom of the tank.
  • Place the other end of the hose in a suitable drainage area.
  • Open the drain valve and allow the tank to empty fully.
  • Once the tank is empty, close the drain valve and remove the hose.
  • Turn on the cold water supply to the tank to flush out any remaining sediment.
  • Close the water supply valve and refill the tank.

By regularly flushing and draining your water heater, you can prevent sediment buildup and improve its energy efficiency.

Insulate Your Water Heater

Insulating your water heater is an effective way to reduce heat loss and improve energy efficiency. Older water heaters or those located in colder areas can benefit greatly from insulation. Follow these steps to insulate your water heater:

  • Measure the height, circumference, and area of your water heater.
  • Purchase an insulation blanket or jacket suitable for your water heater’s dimensions.
  • Carefully wrap the insulation material around the tank, avoiding the thermostat and other control areas.
  • Secure the blanket or jacket with tape or straps, ensuring a snug fit.

Insulation helps retain the heat within the tank, reducing standby heat loss and saving energy.

anode rod replacement.

Regularly inspecting and replacing the anode rod helps prevent corrosion, maintaining the efficiency and lifespan of your water heater.

Check and Replace the Anode Rod

The anode rod plays a crucial role in preventing the corrosion of your water heater’s interior lining. Over time, the anode rod deteriorates and should be checked regularly, especially in areas with hard water. Here’s how to inspect and replace the anode rod:

  • Locate the anode rod’s access point, usually on top of the water heater.
  • Using a suitable tool, such as a socket wrench, unscrew the anode rod and carefully remove it.
  • Check the condition of the rod. If it is heavily corroded or less than 0.5 inches thick, it should be replaced.
  • Purchase a new anode rod of the appropriate size and material (magnesium or aluminum/zinc alloy).
  • Apply plumber’s tape on the threaded end of the new anode rod to prevent leaks.
  • Screw the new anode rod into place and ensure it is tightened securely.

Regularly inspecting and replacing the anode rod helps prevent corrosion, maintaining the efficiency and lifespan of your water heater.

Check for Leaks

Water leaks can cause significant damage and increase your utility expenses. Regularly inspect your water heater and the surrounding area for any signs of leakage. Check for water puddles, dampness, or corrosion on pipes and fittings. If you detect a leak, address it promptly by tightening loose connections or contacting a professional plumber for repairs.

Maintain a Suitable Temperature Setting

Adjusting your water heater’s temperature setting can lead to notable energy savings. While the ideal temperature may vary depending on your needs, most households find a temperature between 120°F (49°C) and 140°F (60°C) comfortable.

However, avoid setting the temperature too high, as it can scald and waste energy unnecessarily. Finding the right balance ensures you have hot water while minimizing energy usage.

Regularly Inspect the Exhaust Vent

If you have a gas-powered water heater, inspecting the exhaust vent is crucial for safety and efficiency reasons. A blocked or poorly functioning exhaust vent can cause the release of harmful gases, such as carbon monoxide, into your home.

Regularly check the vent pipe for any obstructions, such as debris or bird nests. Ensure that it is connected securely and that the joints are properly sealed. If you suspect any issues, contact a licensed professional to inspect, clean, or repair the exhaust vent.

Conclusion

Proper water heater maintenance is essential for lowering your utility expenses and ensuring reliable hot water supply. By following the tips outlined in this article, you can optimize your water heater’s efficiency, extend its lifespan, and reduce energy consumption.

Remember, if you are unsure about any maintenance tasks or encounter significant issues with your water heater, it is always recommended to seek the assistance of a professional plumber or HVAC technician. Investing time and effort into regular maintenance will ultimately save you money and provide peace of mind.

Taking Care of Your Water Heater: A Step-by-Step Guide to Draining and Flushing

a plumber getting ready to flush out a water heater tank.

As a homeowner, it is essential to maintain your water heater regularly to ensure it functions optimally and has a long lifespan. Over time, sediment and mineral buildup can accumulate inside the tank, reducing the efficiency and performance of your water heater. Draining and flushing your water heater is a crucial maintenance task that should be done annually or as recommended by the manufacturer. In this step-by-step guide, we will walk you through the process of draining and flushing your water heater, providing you with the knowledge and confidence to undertake this task.

Why Should You Drain and Flush Your Water Heater?

Before we dive into the steps of draining and flushing your water heater, let’s understand why this maintenance task is essential. Over time, sediment, minerals, and debris can settle at the bottom of the water heater tank. This sediment buildup can cause several problems, including:

  • Reduced Efficiency: Sediment acts as an insulating layer, making it harder for the burner or heating element to heat the water. This can lead to increased energy consumption and higher utility bills.
  • Poor Performance: Sediment accumulation can reduce the water heater’s ability to provide an adequate supply of hot water, leading to lukewarm or cold showers.
  • Increased Risk of Damage: Sediment buildup can cause overheating, which can damage the tank and other components of the water heater.
  • Shortened Lifespan: Neglecting to drain and flush your water heater regularly can significantly reduce its lifespan, leading to costly repairs or premature replacement.

By draining and flushing your water heater, you can remove the sediment and maintain its efficiency, performance, and longevity.

Gather the Necessary Tools and Materials

Before you start, ensure you have the following tools and materials:

  • A garden hose long enough to reach a suitable drain location outside your home.
  • A screwdriver or wrench to open the drain valve.
  • A bucket or large container to collect the drained water.
  • A pair of gloves and protective eyewear to keep yourself safe.

Once you have gathered all the necessary tools and materials, you are ready to proceed with the draining and flushing process.

Step 1: Turn Off the Power and Fuel Supply

Before performing any maintenance on your water heater, it is crucial to turn off the power or fuel supply to ensure your safety. Follow these steps:

  • For Electric Water Heaters: Locate the circuit breaker labeled for your water heater and switch it off.
  • For Gas Water Heaters: Locate the gas supply valve near the bottom of the water heater and turn it off.

By turning off the power or fuel supply, you eliminate the risk of accidents or injuries while working on your water heater.

Step 2: Allow the Water to Cool Down

Next, you need to allow the water inside the tank to cool down before you proceed with draining it. Hot water can cause burns or scalding, so it is essential to exercise caution. The cooling process may take several hours, so it is recommended to perform this maintenance task when you do not need hot water for an extended period.

Step 3: Locate the Drain Valve

The drain valve is usually located near the bottom of the water heater tank. It is a brass or plastic valve with a threaded outlet. Once you have identified the drain valve, follow the next steps to drain the water heater.

Step 4: Connect the Garden Hose

Take one end of the garden hose and connect it to the drain valve outlet. Ensure the connection is secure to prevent any leaks or spills during the draining process.

Step 5: Position the Other End of the Hose

Position the other end of the garden hose at a suitable drain location outside your home. The water expelled from the tank can be hot or contain sediment, so selecting an appropriate drain location is crucial.

Step 6: Open the Drain Valve

Using a screwdriver or wrench, slowly open the drain valve by turning it counterclockwise. Be prepared for water to start flowing into the garden hose and out into the drain. Ensure the bucket or large container is ready to collect the water initially.

Step 7: Drain the Tank

Allow the water inside the tank to drain completely. This process may take some time, depending on the size of your water heater. Be patient and ensure the water is flowing steadily before proceeding to the next step.

Step 8: Flush the Tank

Flushing the tank helps remove any remaining sediment or debris that may not have been expelled during the draining process. To flush the tank, follow these steps:

  • Close the drain valve by turning it clockwise, ensuring it is tightly closed.
  • Turn on the cold water supply to the water heater. The cold water will help flush out any remaining sediment.
  • Allow the water to run through the tank and out through the drain valve for several minutes. This will help flush out any buildup.
  • Once you are satisfied that the tank is thoroughly flushed, turn off the cold water supply.

Step 9: Close the Drain Valve

Using a screwdriver or wrench, close the drain valve by turning it clockwise until it is tightly closed. Ensure there are no leaks around the valve.

Step 10: Refill the Tank

Now that the draining and flushing process is complete, it’s time to refill the water heater tank. Follow these steps:

  • Close the drain valve securely if it is not already closed.
  • Disconnect the garden hose from the drain valve outlet and store it away.
  • Turn on the cold water supply to the water heater.
  • As the tank fills with water, open one or more hot water faucets in your home to release any trapped air.
  • Once you have a steady flow of water from the faucets, close them.
  • Check for any leaks around the connections or drain valve.

Step 11: Restore Power or Fuel Supply

Lastly, restore the power or fuel supply to your water heater:

  • For Electric Water Heaters: Turn on the circuit breaker labeled for your water heater.
  • For Gas Water Heaters: Turn on the gas supply valve near the bottom of the water heater.

Ensure the water heater is functioning correctly and wait for it to heat the water to the desired temperature before using hot water in your home.

in the middle of draining a water heater tank.

Draining and flushing your water heater is a crucial maintenance task that should be done annually or as recommended by the manufacturer.

Maintaining Your Water Heater for Longevity

Draining and flushing your water heater is just one aspect of its overall maintenance. To ensure your water heater operates efficiently and has a long lifespan, consider the following tips:

  • Adjust the Temperature: Set the temperature of your water heater to a suitable level (usually between 120 and 140 degrees Fahrenheit) to prevent overheating and reduce energy consumption.
  • Insulate the Pipes: Insulate the hot water pipes leading from the water heater to maximize energy efficiency and minimize heat loss.
  • Check the Anode Rod: Regularly inspect and replace the anode rod if necessary. The anode rod helps prevent corrosion inside the tank.
  • Test the Pressure Relief Valve: Annually test the pressure relief valve to ensure it is functioning correctly. This valve helps prevent excessive pressure buildup inside the tank.
  • Keep the Area Clean: Ensure the area surrounding the water heater is clean and free from debris to prevent potential fire hazards and allow proper ventilation.

By following these additional maintenance steps and being proactive about the care of your water heater, you can extend its lifespan and enjoy reliable hot water for years to come.

Conclusion

Regularly draining and flushing your water heater is a crucial maintenance task that should not be overlooked. By removing sediment and debris from the tank, you can ensure your water heater operates efficiently, provides an adequate supply of hot water, and has a longer lifespan. The step-by-step guide provided in this article offers you the knowledge and guidance to undertake this essential maintenance task. Remember to always prioritize safety by turning off the power or fuel supply and allowing the water to cool before starting the draining process. With proper maintenance and care, your water heater will continue to serve you well for many years.

What to Do When Your Water Heater Leaks

a leaking water heater in need of repair.

Water heaters are an essential appliance in any home, providing hot water for bathing, cooking, and cleaning. However, like any other appliance, they can develop problems over time. One of the most common issues that homeowners face with their water heaters is a leak. A leaking water heater can not only result in a significant amount of water wastage but can also cause damage to the surrounding area and even your home. If you discover that your water heater is leaking, it’s essential to take immediate action to prevent further damage and ensure the safety of your home and family.

Determine the Source of the Leak

The first step in dealing with a leaking water heater is to identify the source of the leak. This will help you understand the severity of the problem and determine if it’s something you can fix yourself or if you need to call a professional plumber. Here are some common areas where water heaters tend to leak:

  • Pressure Relief Valve: This valve is designed to release excess pressure in the tank. If it becomes faulty, it can cause water to leak.
  • Drain Valve: The drain valve is located at the bottom of the tank and is used to empty the tank for maintenance or repairs. If it’s loose or faulty, it can cause water to leak.
  • Corroded Tank: Over time, the tank can corrode, leading to small cracks or holes through which water can escape.
  • Connections: The fittings and connections around the water heater can become loose or damaged, resulting in leaks.

Shut Off the Power and Water Supply

Once you have identified the source of the leak, it’s crucial to shut off the power and water supply to the water heater to prevent any further damage. This will ensure your safety while you work to resolve the issue. Here’s how you can do it:

  • Electric Water Heater: Locate your electrical panel and turn off the circuit breaker that controls the water heater. If you have a gas water heater, turn the gas supply valve to the “off” position.
  • Water Supply Valve: Close the water supply valve located on the cold water inlet pipe. This will stop the flow of water into the tank.
turn off main water supply.

It’s crucial to shut off the power and water supply to the water heater to prevent any further damage

Addressing the Leaks

Depending on the source of the leak, you can take different approaches to address and fix the problem. Here are some steps you can take:

  • Pressure Relief Valve Leak: If the pressure relief valve is leaking, it may indicate that the pressure in the tank is too high. You can try releasing some water from the valve to see if it stops the leak. However, if the problem persists, you may need to replace the valve.
  • Drain Valve Leak: If the drain valve is leaking, check if it’s loose. You can try tightening it with a wrench. If that doesn’t solve the issue, you may need to replace the valve.
  • Corroded Tank: If the tank is corroded and causing leaks, it’s likely that you will need to replace the water heater entirely. Corrosion is a sign of significant damage, and repairing it may not be a long-term solution.
  • Connections: If the connections around the water heater are leaking, you can try tightening them with a wrench. However, if the leakage continues, it’s best to call a local plumber to examine the fittings and make any necessary repairs.

Preventive Measures

To avoid water heater leaks in the future, there are a few preventive measures you can take:

  • Regular Maintenance: Schedule yearly inspections with a professional who can check for any signs of wear and tear and perform necessary maintenance tasks.
  • Temperature and Pressure Monitoring: Keep an eye on the temperature and pressure settings of your water heater. Excessive pressure can lead to leaks, so ensure they are within the recommended range.
  • Replace Anode Rods: Anode rods are sacrificial rods that attract corrosive elements and protect the tank from rust. Over time, these rods can deteriorate, so it’s important to have them replaced as needed.
  • Consider a Water Softener: If you live in an area with hard water, the minerals in the water can contribute to the corrosion of your water heater. Installing a water softener can help minimize the impact of these minerals.
plumber replacing a water heater in chicago.

When in doubt, always seek the guidance of a professional plumber to ensure the safety and efficiency of your water heater.

When to Call a Professional

While you may be able to address some minor water heater leaks on your own, it’s crucial to know when to call a professional plumber. Here are some situations where professional assistance is recommended:

  • Major Leaks: If the leak is substantial or causes water to accumulate rapidly, it’s best to turn off the water supply and seek professional help immediately.
  • Gas Water Heater: If you have a gas water heater and you suspect a gas leak along with the water leak, evacuate your home and call a professional immediately.
  • No Hot Water: If your water heater is leaking and you’re experiencing a lack of hot water, it may be an indication of a more significant underlying issue that requires professional attention.

In Conclusion

Discovering a water heater leak can be a stressful situation, but by following the appropriate steps, you can effectively address the issue and minimize damage. Remember to shut off the power and water supply, determine the source of the leak, and take the necessary actions to fix the problem. Regular maintenance and preventive measures can also help prevent water heater leaks in the future. And, when in doubt, always seek the guidance of a professional plumber to ensure the safety and efficiency of your water heater.

How to Light a Pilot Light on a Water Heater

light a pilot light.

A pilot light is a small flame that ignites the gas burner in a water heater, allowing it to heat the water inside the tank. If your water heater’s pilot light has gone out, don’t worry! Relighting the pilot light is a relatively simple process that can be done safely with the right tools and instructions. This article will guide you through the step-by-step process of lighting a pilot light on a water heater.

Step 1: Gather the necessary tools

Before attempting to light the pilot light, make sure you have the following tools handy:

  • Long-reach lighter or fireplace match
  • Flashlight
  • Screwdriver (if required for access to the pilot light)

Step 2: Locate the pilot light and gas control valve

The pilot light and gas control valve are usually located near the bottom of the water heater. Look for a metal panel or access door on the front of the heater. Open it carefully to expose the inner workings of the water heater.

Step 3: Switch the gas control valve to “off”

Locate the gas control valve, which is typically a knob or switch near the pilot light. Turn the knob or switch to the “off” position. This shuts off the gas supply to the pilot light and burner.

Step 4: Wait for gas to dissipate

After turning off the gas control valve, it is important to wait a few minutes for any residual gas to dissipate. This ensures that there is no gas buildup when you attempt to relight the pilot light, reducing the risk of a sudden flame or explosion.

Step 5: Access the pilot light

Depending on the type and model of your water heater, you may need to remove a metal panel or access cover to reach the pilot light. In some cases, a screwdriver might be required to loosen screws or fastenings. Follow the manufacturer’s instructions for your specific model.

Step 6: Use the flashlight to locate the pilot light

With the access panel opened, use a flashlight to locate the pilot light. The pilot light is a small tube-like structure that is usually near the gas burner assembly. It might have a small blue flame when it’s lit, but since the pilot light is currently out, you won’t see any flame.

Step 7: Light the pilot light

Take your long-reach lighter or fireplace match and carefully position it near the pilot light opening. Press the ignition button or trigger to create a spark, aiming it directly at the pilot light to ignite the gas. If successful, the pilot light should ignite and produce a steady flame.

Step 8: Hold the gas control valve

After igniting the pilot light, continue to hold down the gas control valve for 30-60 seconds. This allows the heat from the flame to reach the thermocouple, which is a safety device that senses the presence of the pilot flame. Holding down the valve ensures the pilot light stays lit once the control valve is released.

Step 9: Release the gas control valve

After the thermocouple has warmed up, you can release the gas control valve. The pilot light should remain lit on its own. Take a moment to double-check that the flame is stable and not flickering or going out.

Step 10: Close the access panel and check for proper operation

Once the pilot light is successfully lit, close the access panel or door securely. Make sure it is fastened properly to prevent any gas leakage. Turn the gas control valve to the “on” position. Lastly, test the water heater by turning on a hot water faucet in your home to confirm that the water is heating properly.

Conclusion

Relighting a pilot light on a water heater might seem intimidating, but by following these step-by-step instructions, you can do it safely and efficiently. Always remember to exercise caution and follow the manufacturer’s guidelines for your specific water heater model. If you encounter any issues or your pilot light keeps going out, it’s recommended to contact a plumber near you or service technician to inspect and repair the water heater.

How to Maintain an Older Water Heater

Learn How to Maintain an Older Water Heater in this article.

Old household appliances are more susceptible to breakdowns than new ones; all the years of use start to take their toll. The wear and tear on your equipment often mean you can’t get as much work from an old appliance as you can from a new one. Usually, the only way to deal with this loss of reliability is to replace the old water heater tank with a new one.

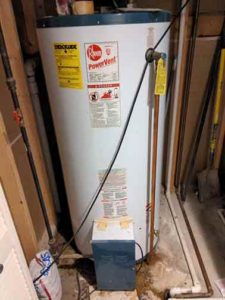
Along with your refrigerator, the water heater is one of the most used appliances in your home. Water heaters are indispensable for making simple things like taking a shower or washing dishes convenient. Without a reliable source of hot water in the house, it would be almost impossible to live in it. Water heater malfunctions are therefore one of the most distressing issues in the home.

Since an older water heater can mean more home maintenance issues, how can you reduce incidences of breakdowns with the older water heater in your home?

There are only two ways to deal with that old appliance. You can replace it with a new one or look for ways to extend its life. Is there any way to keep getting value out of your water heater even when it is old? The answer is yes. All water heaters have their expected lifespan, but you can extend the equipment’s life through proper maintenance, says Rollingwood Management Inc.

The steps for prolonging the life of a water heater are easy to do and affordable. They do not require special knowledge, and you can do them with the tools you already have in your home. All that is needed is to be timely in applying the steps and enlist the help of an expert when it is necessary. Here are the steps to keep your old water heater running smoothly.

Six steps for maintaining an older water heater

Test the TPR Valve

The TPR valve (temperature & pressure relief valve) keeps the water heater safe. It releases water and pressure if these get too high inside the tank. If the thermostat inside your appliance fails and the temperature gets too high, the valve lets the excess steam escape to prevent an explosion. The TPR valve should be tested twice a year by simply carrying it up and down several times. A gurgling sound should follow this action as water flows into the drain tube.

Insulate the pipes

By reducing the rate of condensation, insulated hot water pipes cut heat loss by as much as 45% and reduce your heating costs by 9% or more. To insulate the pipes, you need self-sticking 3/8-inch foam pipe insulation. The foam should match the diameter of your pipes. Slide the foam over the hot/cold water pipes as far as it will go. Then squeeze the end of the foam and tape it. Ensure at least 6 inches of space between the insulated pipe and the flue.

water-heater-insulation

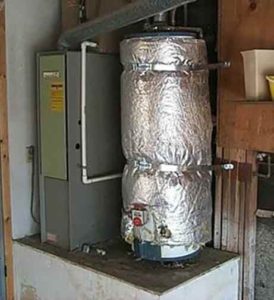
Insulate the water heater tank

Insulating your water heater will improve its efficiency, reduce heat loss and shave dollars off your heating bill. Insulating the water heater is as simple as wrapping the tank with an insulating blanket. Buy an insulating blanket that matches the size of your water heater tank. Turn the power off on the appliance and wrap the blanket tightly around the tank. Cut off those parts of the blanket that cover the valves and panels. Turn the power back on.

Setting the temperature

The optimal temperature setting for your water heater will let you maximize the appliance and prolong your water heater’s life. For the best results, set the temperature between 130F° and 140F°. Higher temperature settings can result in burns. Lower settings may encourage bacteria to grow inside the tank. To set the temperature, look for the temperature dial on the side of the tank. Unscrew the cover. Using a flathead screwdriver, adjust the dial to the required settings.

Flush the tank

All the mineral content and particles in the water entering your water heater can end up inside the tank. As the water gets heated and evaporates, it leaves sediments that can impair the performance of your appliance. Sediments also increase the risk of rust and explosions. To get rid of deposits, you should flush the water heater tank twice a year. That is as simple as opening the drain cock and cold water supply valve. Let the water run for five minutes or until all sediment at the bottom of the tank washes out.

Check the anode rod

The anode rod protects your water heater from corrosion. It is the first thing the chemicals inside the water entering your home will attack. That is why the anode rod in your water heater gets eaten up. Without the anode rod, the corrosive elements in water will start attacking your water heater. Replacing the anode rod can save you the cost of buying a new water heater. Inspect the rod every year to ensure it is still in good shape.

error: Content is protected !!