As a homeowner, having your water heater properly maintained is crucial to ensure it runs at peak efficiency and longevity. Sediment and mineral buildup will accumulate inside the tank over the years, reducing the efficiency and performance of your water heater. Draining and flushing your water heater is a critical maintenance process that must be done annually or as recommended by the manufacturer. Here in this step-by-step instruction, we’re going to take you through draining and flushing your water heater step by step so that you can have both the confidence and knowledge to do the task.
Why Should You Drain and Flush Your Water Heater?
Before we dive into the steps of draining and flushing your water heater, let’s understand why this maintenance task is essential. Over time, sediment, minerals, and debris can settle at the bottom of the water heater tank. This sediment buildup can cause several problems, including:
- Reduced Efficiency: Sediment acts as an insulating layer, making it harder for the burner or heating element to heat the water. This can lead to increased energy consumption and higher utility bills.
- Poor Performance: Sediment accumulation can reduce the water heater’s ability to provide an adequate supply of hot water, leading to lukewarm or cold showers.
- Increased Risk of Damage: Sediment buildup can cause overheating, which can damage the tank and other components of the water heater.
- Shortened Lifespan: Neglecting to drain and flush your water heater regularly can significantly reduce its lifespan, leading to costly repairs or premature replacement.
By draining and flushing your water heater, you can remove the sediment and maintain its efficiency, performance, and longevity.
Gather the Necessary Tools and Materials
Before you start, ensure you have the following tools and materials:
- A garden hose long enough to reach a suitable drain location outside your home.
- A screwdriver or wrench to open the drain valve.
- A bucket or large container to collect the drained water.
- A pair of gloves and protective eyewear to keep yourself safe.
Once you have gathered all the necessary tools and materials, you are ready to proceed with the draining and flushing process.
Step 1: Turn Off the Power and Fuel Supply
Before performing any maintenance on your water heater, it is crucial to turn off the power or fuel supply to ensure your safety. Follow these steps:
- For Electric Water Heaters: Locate the circuit breaker labeled for your water heater and switch it off.
- For Gas Water Heaters: Locate the gas supply valve near the bottom of the water heater and turn it off.
By turning off the power or fuel supply, you eliminate the risk of accidents or injuries while working on your water heater.
Step 2: Allow the Water to Cool Down
Next, you need to allow the water inside the tank to cool down before you proceed with draining it. Hot water can cause burns or scalding, so it is essential to exercise caution. The cooling process may take several hours, so it is recommended to perform this maintenance task when you do not need hot water for an extended period.
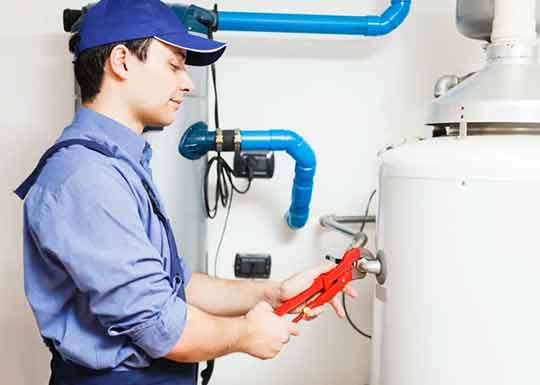
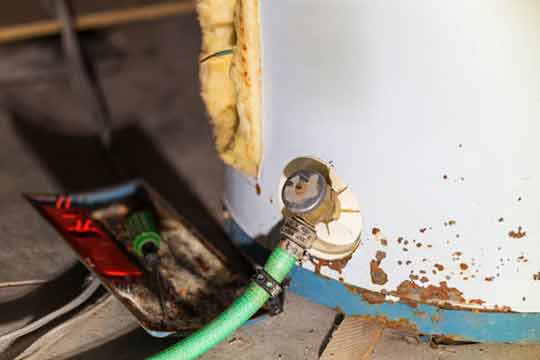
Step 3: Locate the Drain Valve
The drain valve is usually located near the bottom of the water heater tank. It is a brass or plastic valve with a threaded outlet. Once you have identified the drain valve, follow the next steps to drain the water heater.
Step 4: Connect the Garden Hose
Take one end of the garden hose and connect it to the drain valve outlet. Ensure the connection is secure to prevent any leaks or spills during the draining process.
Step 5: Position the Other End of the Hose
Position the other end of the garden hose at a suitable drain location outside your home. The water expelled from the tank can be hot or contain sediment, so selecting an appropriate drain location is crucial.
Step 6: Open the Drain Valve
Using a screwdriver or wrench, slowly open the drain valve by turning it counterclockwise. Be prepared for water to start flowing into the garden hose and out into the drain. Ensure the bucket or large container is ready to collect the water initially.
Step 7: Drain the Tank
Allow the water inside the tank to drain completely. This process may take some time, depending on the size of your water heater. Be patient and ensure the water is flowing steadily before proceeding to the next step.
Step 8: Flush the Tank
Flushing the tank helps remove any remaining sediment or debris that may not have been expelled during the draining process. To flush the tank, follow these steps:
- Close the drain valve by turning it clockwise, ensuring it is tightly closed.
- Turn on the cold water supply to the water heater. The cold water will help flush out any remaining sediment.
- Allow the water to run through the tank and out through the drain valve for several minutes. This will help flush out any buildup.
- Once you are satisfied that the tank is thoroughly flushed, turn off the cold water supply.
Step 9: Close the Drain Valve
Using a screwdriver or wrench, close the drain valve by turning it clockwise until it is tightly closed. Ensure there are no leaks around the valve.
Step 10: Refill the Tank
Now that the draining and flushing process is complete, it’s time to refill the water heater tank. Follow these steps:
- Close the drain valve securely if it is not already closed.
- Disconnect the garden hose from the drain valve outlet and store it away.
- Turn on the cold water supply to the water heater.
- As the tank fills with water, open one or more hot water faucets in your home to release any trapped air.
- Once you have a steady flow of water from the faucets, close them.
- Check for any leaks around the connections or drain valve.
Step 11: Restore Power or Fuel Supply
Lastly, restore the power or fuel supply to your water heater:
- For Electric Water Heaters: Turn on the circuit breaker labeled for your water heater.
- For Gas Water Heaters: Turn on the gas supply valve near the bottom of the water heater.
Ensure the water heater is functioning correctly and wait for it to heat the water to the desired temperature before using hot water in your home.
Draining and flushing your water heater is a crucial maintenance task that should be done annually or as recommended by the manufacturer.
Maintaining Your Water Heater for Longevity
Draining and flushing your water heater is just one aspect of its overall maintenance. To ensure your water heater operates efficiently and has a long lifespan, consider the following tips:
- Adjust the Temperature: Set the temperature of your water heater to a suitable level (usually between 120 and 140 degrees Fahrenheit) to prevent overheating and reduce energy consumption.
- Insulate the Pipes: Insulate the hot water pipes leading from the water heater to maximize energy efficiency and minimize heat loss.
- Check the Anode Rod: Regularly inspect and replace the anode rod if necessary. The anode rod helps prevent corrosion inside the tank.
- Test the Pressure Relief Valve: Annually test the pressure relief valve to ensure it is functioning correctly. This valve helps prevent excessive pressure buildup inside the tank.
- Keep the Area Clean: Ensure the area surrounding the water heater is clean and free from debris to prevent potential fire hazards and allow proper ventilation.
By following these additional maintenance steps and being proactive about the care of your water heater, you can extend its lifespan and enjoy reliable hot water for years to come.
In Summary
Draining and flushing your water heater regularly is a significant maintenance task that you should never overlook. By flushing sediment and debris from the tank, you can make your water heater operate efficiently, have an ample supply of hot water, and gain a longer appliance lifespan. The step-by-step guide provided in this article provides you with the information and instructions to carry out this essential maintenance task. Remember to prioritize safety first by turning off the power or fuel supply and allowing the water to cool down before starting the draining process. With proper care and maintenance of your water heater, it will continue to function properly for years to come and avoid a premature water heater replacement.
[…] the tank helps take away these deposits and prevents corrosion. It is strongly recommended to flush the tank no less than annually, particularly earlier than the winter season. Flushing may be performed by following the […]