Author Archives: Chicago Plumbing Experts

Signs You Have a Hidden Leak

Signs You Have a Hidden Leak

The plumbing system in your home should be considered a modern day miracle. Think about it for a moment. What would your life be like without a system that efficiently delivers water to every part of your home? You would quickly revert to the old ways of drawing water from a well and hauling it into your home. Imagine having to do that in the dead of winter?

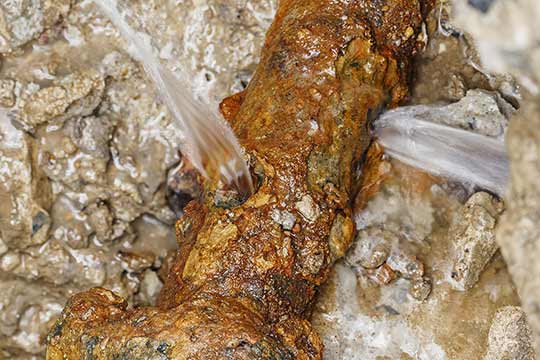
But just as the plumbing in your home can be a blessing when it works properly, American Dream Realty & Management says, the plumbing can also be a curse if it goes wrong. That is because water is highly mobile and will not always restrict itself to the path you have created for it. If there is an accidental opening in any part of your plumbing system, the water inside your pipes will find its way out.

But the trouble is you will not always know when this has happened. The plumbing in an average home has hundreds of feet of piping hidden behind walls, floors, and ceilings. Since plumbing pipes are often hidden from view, it is hard to tell when there is a leak in one of them. That is until water starts to damage the structures of your building.

Is there a way to know when there is a leak in your home’s plumbing systems? Can you detect leaks in pipes that are out of sight before those leaks cause massive damage to your home’s walls, floors, and ceiling? The answer is yes, you can! 

In this post, we explain all the signs you will see in your home if there is a hidden leak in your plumbing.

Signs that you have a hidden leak

Here are things to look for if you suspect there is a leak in your plumbing but are not quite sure:

Higher water bills

The first sign of a hidden leak in your plumbing is a sudden spike in your water bill. Never underestimate the impact a single dripping faucet or pipe joint can have on your water bill. Even if it is dripping at the rate of one small drop per second, that tiny leak will spill enough water to reflect in your water bill. 

If your water bill has recently increased, but you have not changed your habits, you might want to check your plumbing for possible leaks.
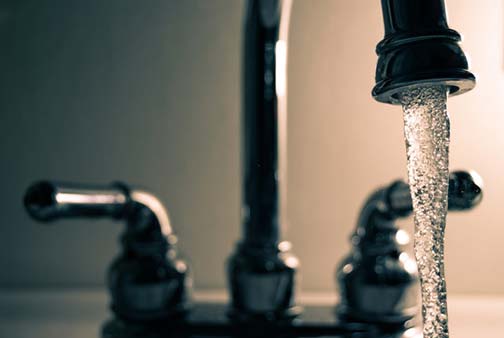
Low water pressure

The correct water pressure is essential for properly functioning your home’s plumbing. Imagine the frustration of trying to shower when the water pressure is low. A leak in one of your pipes will siphon pressure from the system and cause the overall water pressure for the home to dip.

Three things can affect the water pressure in your home: the water pressure from the municipal water supply, the design of your home’s plumbing system, and a leak in the plumbing. If you have recently started to experience low water pressure, you may have a leak in your plumbing.

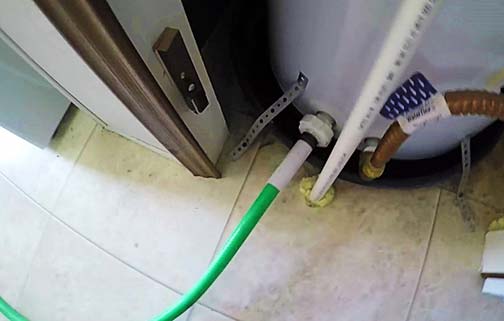
Dampness, mold, and mold odor

Leaks inside the walls or floors of your home do not always reveal themselves as water puddles or moisture from the affected parts of the house. In place of this obvious sign, you may find that certain surfaces are always damp. 

In addition to dampness, you may also notice mold and mildew on those surfaces. Water, along with the growth of mold and mildew, can happen out of sight, depending on where the leak is located. In such cases, the smell of mold will often betray what is happening in that part of the house.

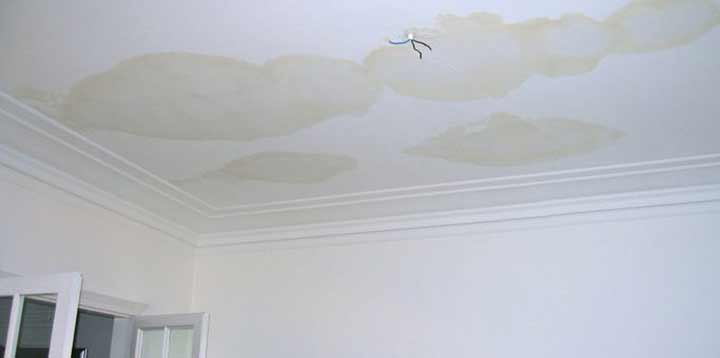
Damaged walls and ceilings

A common sign of hidden leaks is peeling or bubbly paint. If you see blisters or peels in the paintwork on any surface, a leak could be lurking behind the surface. The smell of decaying wood is another sign that water is attacking the internal structures of your building. Water leaks inside your walls will also weaken drywall. If drywall is soft, it is usually because of water or moisture. A damaged carpet is another sign of a water leak in your home.

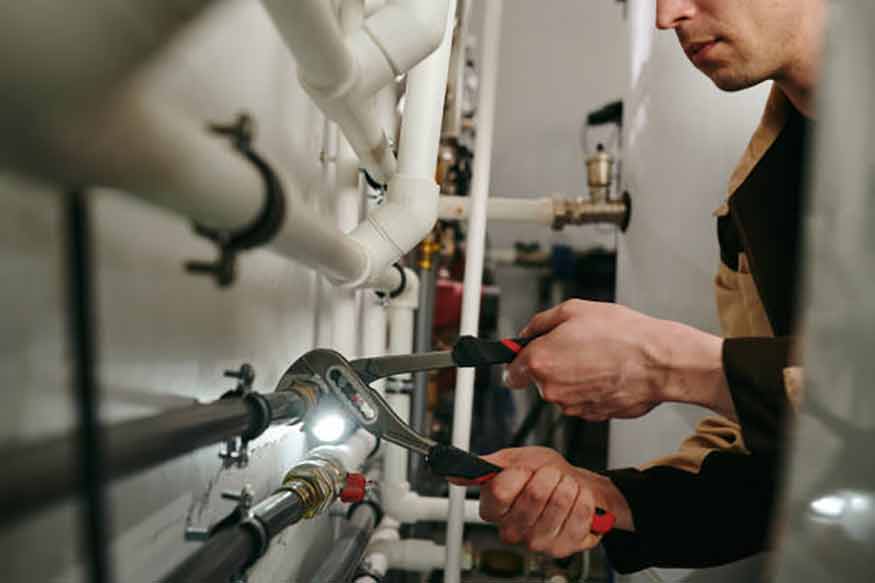
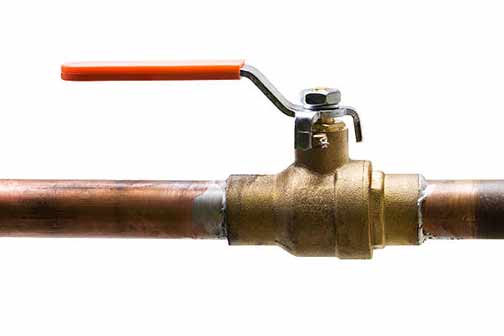
Strange water meter behavior

To check if there is a hidden leak in your home, do this. Turn off all faucets and water-utilizing appliances. Go to your water meter and look at the face of the meter. You should see a dial, counter, and tiny gear-like wheel; these should not be moving when no water is flowing in your home. Take note of the positions of the dial, counter, and wheel, and wait 30-60 seconds. If the position of any of these changes within that time, you have a hidden leak inside your home. The next step is to find the location of the leak in your home. If you are unable to find the leak on your own, there are services to help find hidden leaks in your home.

What to Know About Leaking Cast Iron Pipes

What to Know about Leaking Cast Iron Pipes

Plumbing pipes will leak, corrode, or burst at some point in their life. That is one of the realities of plumbing systems. The best you can hope for, says Volusia County Property Management, is to repair or replace the pipes before this happens or catch the problem on time; before it causes significant damage.

But a lot also depends on the kind of pipes you have in your plumbing systems. Generally, your sewer line and water pipes will be made of one of these three materials: clay, cast iron, or PVC. Clay pipes are the oldest of these three, which went out of use more than 80 years ago.

Cast iron pipes are not old as clay pipes, and they were used until the late 1980s. But even though cast iron pipes have been phased out, it is not surprising to find homes with sewer or water pipes made of cast iron. What are the issues with cast iron pipes?

What you should know about cast iron pipes

Cast iron pipes were introduced around 1900 as a replacement for clay pipes. These were commonly used until the 1980s, when they stopped being used for residential plumbing installations. But even after the arrival of PVC, cast iron pipes were still used, especially as underground piping.

Cast iron pipes have 50-100 years life expectancy, but this is only for above-ground installations. Once cast iron pipes are buried in the ground, their life expectancy falls by 50%. What are the reasons for this shorter lifespan?

Cast iron is a form of iron, and as you know, iron rusts. The rate at which iron rusts depends on how much water it is exposed to. Above-ground cast iron pipes are exposed to less water than below-ground cast iron pipes, hence the difference in their life expectancies.

When cast iron pipes are buried, they are exposed to moisture from both sides. On the outside, the pipes are in contact with the soil around them, and they will get wet. At the same time, they are also wet on the inside because of the water that is constantly running through them.

From the first minute you lay a cast iron pipe in the ground, it starts to deteriorate. In addition to water, other things can accelerate the deterioration of cast iron pipes and influence how fast the pipes begin to leak. These include:

Detergents, shampoo, and soap

These have caustic substances inside them that react with the metal in cast iron pipes and eat away at the materials of those pipes. Whether this is laundry soap or dishwashing soap, they will accelerate the deterioration of your cast iron pipes.

Chemical drain cleaners

Chemical drain cleaners are bad for plumbing systems, regardless of whether you have PVC or cast iron pipes. This is not to say that chemical drain cleaners will not remove clogs in your home drains. They will remove clogs, but they will also damage your pipes

This is because of the active agent in drain cleaners, such as sulfuric acid, or other corrosive materials. Acids and cast iron pipes do not mix well; using chemical drain cleaners when you have iron plumbing is a bad idea.

Acidic soils

Soil conditions will also affect the performance and lifespan of your cast iron pipes. Acidic soils have the same effect on cast iron pipes as drain cleaners. If the soil in your area is acidic, the cast iron pipes will break down faster and leak. 

Grease buildup

In PVC pipes, grease can build up and block the drainpipes. But the effect of grease inside cast iron pipes is worse. Grease will not simply clog a cast iron pipe; it will cause it to rot. 

When grease sits in any part of your cast iron piping for a long time, it results in what is known as “channel rot.” This is where grease eats out a whole section of piping until the soil outside the pipe is visible from inside the pipe. When this happens, you cannot simply clean the pipe; you have to replace it.

If you still have cast iron pipes in your plumbing system, what can you do about them? If you have been experiencing slow drains, leaks, or persistent backups, you can have your pipes inspected to know the cause of the problem. A sewer camera inspection will tell you the state of your pipes and help you decide the next steps.

But if you really want to solve the issues permanently, the best option is to completely replace your home plumbing pipes. Replacing pipes in a plumbing system is not cheap, and you may not be ready for that expense. That is understandable. However, if you really want peace of mind from your plumbing system, this is something you should start to plan and prepare for.

Why Hydro-Jetting is the Go-To Solution for Commercial Plumbing

Why Hydro-Jetting is the Go-To Solution for Commercial Plumbing

Commercial plumbing systems work harder than the plumbing systems in residential properties. In a typical household, says Keyrenter Buxmont Management, the plumbing system only serves the limited needs of a small family. But commercial systems often provide round-the-clock service to hundreds of people.

In addition to serving individuals, commercial plumbing systems cater to the unique needs of the businesses on the premises. If there is a restaurant or commercial kitchen on the property, the plumbing will often have to deal with oils and food waste being dumped into drains.

Industrial facilities may also wash debris of all sorts into floor drains. During peak business hours, a sudden influx of visitors can lead to drains being heavily used within a short period. What’s more, many of those visitors will flush non-flushable items into the building’s drains.

The overall effect of all these is that commercial plumbing is more vulnerable to clogs than its residential counterparts. Clogs in commercial plumbing systems are also more damaging. They are harder to find and their impact is greater due to the number of people who use the system.

If you operate a commercial property or your business is leasing one, finding a way to minimize clogs in the plumbing can be challenging. If the issue is not handled well, it can take a toll on your energy and revenues. But thankfully, there is an effective way to deal with this problem. 

Hydro-jetting is a proven method for clearing clogs in drainpipes. Hydro-jetting cleans drains by forcing a stream of high-pressured water into pipes to blast away obstructions – grease, tree roots, or any kind of blockage – inside the pipes.

The equipment used for this consists of a gas-driven pump connected to a large tank of water. This pump is hooked to a flexible hose with a high-pressure nozzle at its end. The hose, which can resist high water pressure, is inserted into the drain until it reaches the blockage.

The hydro-jetting machine can generate water pressures of between 4,000 psi and 60,000 psi. The pressure used in the operation depends on the kind of blockage and the characteristics of the piping. Hydro-jetting is simply power-washing for drains.

When hydro-jetting, the direction, speed, and shape of the water can be varied by the type of jet nozzle being used and the amount of pressure generated by the tank. The water may be triangular, rotating, or focused on a narrow area, depending on the nozzle used.

This flexibility gives hydro-jetting the ability to remove different kinds of blockages quickly and safely, regardless of the age, materials, and strength of the pipes. Hydro-jetting is effective for clearing rust, grease, mineral buildup, or tree roots from sewer lines.

a professional plumber performing commercial hydro jetting service.

In addition to removing deadly blockages, hydro-jetting will clean the inside walls of your drainpipes.

Why is hydro-jetting the go-to solution for commercial plumbing?

For commercial property owners, clogged pipes are a huge headache because removing the obstruction often involves expensive excavations. Commercial hydro jetting dispenses the need to dig up your drainpipes. Other reasons to use hydro-jetting instead of other drain cleaning methods are:

It removes debris effectively

Hydro-jetting will use the hydraulic power of water, one of the most potent forces known to man, to forcibly dislodge even the most established blockages from your drains. Along with removing and breaking up the obstacle, it will wash them down into the city sewers where they will not cause any problems.

Methodical pipe cleaning 

In addition to removing deadly blockages, commercial hydro jetting will clean the inside walls of your drainpipes. Using a rotating nozzle, the hydro-jet can scour the surfaces of pipes to clear them of dirt. Clean pipes are less likely to become clogged since there are no protrusions on their surface that can catch or slow the debris inside wastewater.

It saves time

Removing clogs with methods that require excavation often means businesses must close shop while the operation goes on. The result is lost revenue and opportunities. Commercial hydro-jetting helps you avoid this because it is completely non-intrusive. The staff and customers may not even be aware that your drain is being cleared.

Hydro-jetting is affordable

Hydro-jetting your drains will save or make you money in three distinct ways. Clearing your drains and preventing clogs, saves you the cost of replacing broken sewer pipes. By not disrupting your business it helps you make money. Also, because hydro-jetting does not involve expensive digging, it can be affordable.

Hydro-jetting is versatile

Hydro-jetting is effective for removing different types of blockages. By varying the speed of the water stream and using the right nozzle, you can apply this method to any kind of drain clog. This form of commercial drain cleaning service is safe because it also takes into consideration the age of your pipes and will not damage your drains.

It is environmentally friendly

Hydro-jetting does not utilize harsh chemicals or any toxic substances. There is no risk of a corrosive residue being left behind inside your pipes. This drain-cleaning method will not introduce toxins into groundwater systems. The only ingredient it uses is water and water is perfectly safe.

The 5 Most Common Plumbing Issues in Commercial Buildings

The 5 Most Common Plumbing Issues in Commercial Buildings

Plumbing systems are often the most overworked mechanical systems in any building. Throughout the course of a single day and, sometimes even at night, the plumbing is called upon to handle a constant load of clean water, wastewater, and submerged solids.

Plumbing systems are exposed to a wide variety of stresses. Some of these stresses include the friction and corrosive effect of flowing water, along with the chemical impact of the dissolved contents in the water. Plumbing systems may also be damaged by mishandling.

This is why plumbing issues are easily the most common maintenance issue you will have in your building. In addition to this, the other two challenges with plumbing issues at your business are that they are tricky to detect and costly to fix.

Plumbing issues in commercial buildings

The impact of malfunctioning plumbing systems is greater when it happens in a commercial building. Commercial plumbing systems are more extensive and a lot more complicated than residential systems, explains Campus Connection Management. When they have problems, those problems tend to be harder to solve.

Moreover, because of the number of people who use a commercial facility, issues with the systems will have a more widespread impact. It will not only devastate the operations of the businesses in the building, but it can also hurt the income of your tenants.

This is why it is important to know the common plumbing issues you are likely to encounter in your commercial building. Knowing this will let you determine the right steps to protect the systems, detect problems early and solve them before they get worse.

Here are the 5 most common plumbing issues in commercial buildings:

Clogged drains

Clogged drains are probably the number one issue you will face with your commercial plumbing system. This is partly due to the large volume of waste passing through the drainpipes. Also, commercial plumbing is more exposed to abuse, since it is harder to control the number of people in the facility who uses the plumbing. 

As a result, you are more likely to have issues with people flushing non-flushable objects into the drains. Additionally, the presence of commercial kitchens, restaurants, or similar businesses in a commercial building means there is a huge possibility of fats, oils, and grease (FOGs) finding their way into the drains and clogging them.

All kinds of leakages

Commercial plumbing systems are expansive; they feature miles and miles of pipework that are subject to constant pressure throughout the day. With the level of sustained use that commercial plumbing systems see, it is normal for problems to occur within their networks of pipes. 

One common issue is leaking from pipes, faucets, sinks, or toilets. This can be a persistent problem in commercial facilities and the issue is often connected to misuse of the plumbing by people who work in or visit the building. Another reason why leaks seem to reoccur in commercial buildings is the vastness of the system makes it hard to track problems and fix them on time.

Water temperature issues

The people who use the plumbing systems in a commercial property have the same need for hot water as people using a residential plumbing system. But because of the size of the demand for hot water in commercial facilities, commercial water heaters are many times larger and more complicated than residential systems. 

Commercial water heaters depreciate faster due to the work they must do to meet the huge demands on them. Additionally, commercial water heaters are subject to tougher regulations. They often need to be able to meet the unique hot water requirements of the businesses that occupy the facility.

Damaged piping

The incidence of damaged pipes is higher in commercial plumbing systems because of the sheer size of the pipe network. The probability of problems within a plumbing system increases with the size of the system and the number of people using it. Also, the fact that pipes in a commercial plumbing system are subject to extreme pressures that residential plumbing systems are not exposed to makes them more vulnerable to damage such as a burst pipe emergency.

Furthermore, it is a lot of work to monitor the hundreds of miles of pipes in a commercial property. Therefore, when there are problems with one of the pipe sections in the network, the chances that the issue will escalate are higher.

Sewage odors

This is probably the most damaging plumbing issue you can have on your commercial property. If bad odors are coming from pipes and plumbing fixtures in the property, it will wreak havoc on the businesses on your premises. The problem will affect everyone who visits the facility even if they don’t use any of the plumbing features. 

What causes bad odors from a plumbing system? The likely causes are burst piping, clogged drains that need cleaning, and dry pipes. Sewage odors in your facility must be dealt with quickly if you don’t want to lose your customers and subject your employees to an unpleasant working environment.

Symptoms of a Sewer Drain Clog

Symptoms of a Sewer Drain Clog

A clogged sewer drain is one of the very worst plumbing problems to have in your home. Just imagine the spectacle of wastewater with human waste and all kinds of filth bubbling up from a drain and flooding your home. This problem is better imagined than experienced.

A clogged sewer drain will not only cause flooding in your home, but it will also expose everyone in the house to significant health risks, warns IPM Management. Preventing sewer drain clogs is the best way to deal with them. But to prevent a sewer drain clog, you must know the signs of problems with your sewer drains.

How sewer drains work

All homes that are connected to the city sewer service have a single underground sewer drainpipe that runs from the home to the city’s systems. This pipe collects wastewater from all the drainpipes inside the home and channels it to the city sewers.

This main pipe is usually 3 or 4”in diameter and hooked to the home’s main drain. Other drainpipes that run from the home’s main drain to its various plumbing fixtures (sinks, showers, or toilets) often have a smaller diameter of 1 ¼ to 2 ½”. 

If the main sewer drainpipe which connects the home to the city systems is blocked, wastewater from the home will not pass through. Instead of going to the underground city sewer lines in the street, it will build inside the pipes until it eventually backs up into your home.

Signs that your main sewer drain is clogged

Here are the signs you will see in your home when there is a clog in your main sewer line.

Plumbing fixtures are clogged at the same time

Depending on how you manage your home’s plumbing, you may experience clogged drains from time to time. But when this happens, it is either the toilet, sink, or shower drain is clogged.

You usually shouldn’t have multiple fixtures clogged at the same time. If you find that two or more of the drains in the main level of your home are clogged, you may want to inspect your main sewer lines.

Toilets that won’t flush

This is one of the clearest signals that your main sewer line is in trouble. Toilet drains can get clogged as a result of flushing non-flushable items down the toilet. If you hear a gurgling sound from a toilet whenever you use a sink, bathtub or washing machine, it’s a sign that your main drain may have problems.

Blocked tubs and showers

A clog in the main sewer drain will show up in the shower and tub before you see signs of it in the sinks. That’s because shower and tub drains sit at a lower level than sink drains. 

As a result, issues with the main drain will become evident in those lower drain openings first. If shower and tub drains are filling with wastewater or draining slowly, you could have a clog in your main drain.

Strange reactions when using a sink

Typically, you will not experience backflow of wastewater at the sink because sinks are at a higher level than toilets and showers. But you may have trapped air in the sink drain if your main sewer line is clogged. 

Another sign to look for is gurgling sounds from the toilet closest to the sink or a change in water level inside the toilet bowl whenever you run water in the sink.

Overflow/backup when using the washing machine

If your main sewer drain is clogged, one of the signs is when draining water out of your washing machine, the toilet to overflow or results in backflow inside a tub or shower drain. If this problem is also accompanied by toilets that do not flush properly, you can be sure that your main sewer line is blocked.

What to do if your main sewer drain is clogged

Follow these steps if you think the main sewer drain in your home is blocked:

  • This is not a problem you can solve by yourself. Get a drain specialist to inspect the main sewer lines; they have the tools to correctly diagnose and quickly solve the problem.

  • Do not run the water in your home or flush any toilet. As long as you do not send more wastewater into your sewer drains, the problem will not get worse. Wait for the specialist to arrive.

  • To make sure a faucet in the home is not accidentally opened, shut off the water supply to the entire home from the main shut-off valve (not the shut off valve for individual fixtures).

What if after the drain cleaning specialist has camera inspected your main sewer line, they determine that the problem is from the city sewer lines? What can you do in this situation? For issues with the city sewers, talk to city officials. The city sewer line is outside your line of authority.

How to Thaw and Prevent Frozen Water Pipes

How to Thaw and Prevent Frozen Water Pipes

Frozen water pipes are a constant threat during winter. If the only issue with frozen pipes is the temporary disruption of water supply to parts of your home, the problem would be easier to endure. But frozen water in your pipes can leave you with damaged pipes and expensive repairs, warns Liberty Real Estate Services.

Water expands when it freezes and can exert pressures of over 2000 pounds per square inch. This is enough force to rupture your pipe or, at the very least, weaken them. Typically, you don’t even know this is happening until the ice thaws and your basement is suddenly flooded.

The result is damaged walls, ceilings, and floors that cost tens of thousands of dollars to repair.  This problem mostly happens to pipes that are connected to outside-facing walls, pipes in under-the-sink cabinets, unheated basements or crawlspaces, and outdoor faucets.

What can you do if a pipe in your home is frozen but not ruptured? Is there a way to thaw the frozen pipe without damaging it? Yes, you can thaw a frozen pipe without damaging it. Below are the steps to do this, depending on the location of the pipe inside your home.

Frozen pipes inside walls

Pipes embedded in the walls or ceilings of your home may become frozen. Unfreezing them is harder than thawing pipes that are exposed. If you find that one of the pipes inside the walls or ceilings of the house is frozen, here is what you can do:

Turn up the heat in your entire home – Ensure you leave the cabinet door open if the frozen pipe is in a wall inside your bathroom or beneath the base cabinet for your kitchen sink or vanity. This will let warm air in your home carry heat to the wall.

Open up the wall section –  If you cannot wait to let the heated air in your home defrost the pipe, maybe because you think a burst pipe is looming, use this solution. Cut the section of wall or ceiling directly above the pipe and use the same methods you would use to thaw an exposed pipe (explained in the next section).

Thawing exposed pipes that are frozen

If it is an exposed pipe, thawing it is easier since you can apply the steps above directly to the pipe. There are three ways to thaw exposed pipes. Regardless of the one you choose, always start by applying the heat from the faucet side of the pipe or the side closest to the water main and move forward to the frozen area.

Using a hair dryer – This method is the easiest and safest. The items you need are things you already have in the home. To help direct the heat to the backside of the pipe, place a cookie sheet behind the pipe. When defrosting a frozen pipe with a water heater, apply the heat using a sweeping motion across the frozen pipe section.

Use a portable heater – You may also thaw frozen pipes with a space heater. Turn the space heater to its highest setting and let it warm the air around the frozen pipe. Remember to open the doors of the cabinet if the pipe is in a cabinet under the kitchen sink or bathroom vanity.

Use an electrical heat tape – The third way to thaw frozen pipes is with a heat cable; a freeze protection cable you place directly on pipes to unfreeze them. To use the tape, attach it to the copper or plastic pipe with electrical tape, making sure the thermostat is directly on the pipe to sense its temperature.

How to prevent your pipes from freezing

The best way to deal with frozen pipes in your home is to not have them at all. After thawing the pipe, here are a few simple steps you can take to make sure you don’t have this problem ever again.

Keep faucets dripping – If it gets really cold and you think a pipe in your home might freeze, leave the faucet dripping to keep the water inside the pipes moving. This will prevent freezing.

Open the cabinet doors – Keep cabinet doors open to let warm air from the rest of the house circulate into the colder areas inside the cabinet. This will usually be sufficient to keep pipes from freezing.

Wrap the pipe with electrical heat tape – If a pipe is in the habit of freezing, wrap it permanently with electrical heat tape and turn on the heat if the weather starts to get cold.

Add insulation to pipes – To keep pipes in unheated spaces like basements and crawlspaces from freezing, wrap them with foam insulation. But this will only work if the rest of the room is not cold.

Install a permanent space heater – Permanently installing a space heater in unheated spaces in the home – garage, basement, and crawlspace – will keep exposed pipes or pipes inside the walls from freezing.

Disconnect garden hose in winter – If your faucet is not frost-proof, it will be vulnerable to freezing. Prevent this by turning off the water supply to the faucet and removing the garden hoses connected to it. If the outdoor faucet freezes it may need a repair or replacement come Spring time.

Important Questions to Ask a Chicago Plumber Before Hiring

Important Questions to Ask a Chicago Plumber Before Hiring

Finding the right plumber when you have plumbing issues in your home is more than half the effort of solving the problem. A good plumber looks holistically at your plumbing systems, instead of simply focusing on the single issue you reported, as amateurs do. That plumber not only solves the plumbing problem but also helps you prevent future problems.

How do you find that kind of plumber?

Most homeowners wait until there is a pressing problem with their plumbing before they look for a plumber, says Envy Property Management. When you do this, chances are you won’t care much about the qualifications of the person you hire. You just want them to make the problem go away. This is one reason why plumbing problems in your home are never completely solved.

To find a qualified Chicago plumber, you should start the process long before there are issues with your home’s plumbing. This will help you avoid the anxieties that lead to hiring the wrong person. 

So, what criteria should you use when trying to find a plumber for your home? If you live in the Chicago area, the list below will answer that question for you.

Are they local or national?

A national chain may have all the right people but the two things they lack are flexibility and a personal touch. These are important when looking for a plumber. You want a local company that you can build a long-term relationship with. That plumber should come to know your home’s plumbing intimately so that they can diagnose and solve problems quickly and economically.

What kind of plumbing services do they provide?

When looking for a local plumber for your home, you do not want to hire a commercial plumber in Chicago. Commercial and residential plumbing systems are very different, and a commercial plumber may not give you the kind of service you need in your home. Only hire a commercial plumber if they also provide residential plumbing services.

Ask about licensing, qualifications, and memberships

Plumbers in Chicago are required to have up-to-date licenses to practice in the city. Check that the plumber is properly licensed by the city. You will also want to know if they are members of the local chapter of their professional organization. The training of the employees who will be doing the work matters, so make sure to ask about that.

How long have they been in business?

Experience counts: not everything is learned in training. The longer a plumber has been in business, the more time they have had to gain the needed expertise to solve the most difficult plumbing issues. The other reason to hire an experienced plumber is you can use them as your sounding board; they become a trusted adviser on all plumbing issues.

Are they bonded and insured?

What kind of insurance do they have? How much insurance do they carry? The plumber’s insurance policy should include worker compensation for any worker who is injured while on your property, liability insurance to protect you from lawsuits, and property insurance if your property is damaged by their workers.

What do others say about them?

The company should have an online footprint that you can follow. Check online review sources to see what people are saying about them. Look out for negative reviews and pay particular attention to how the company responds to those. Some online sources where you can look for reviews are BBB (Better Business Bureau) and Yelp.

Can they provide references?

Ask the plumber for a verifiable list of people who have used their services in the last year. These should be people who live in Chicago. Ask the plumber’s permission to contact these references. Make sure to call some of the people on the list to find out what their experience of working with the plumber was like.

Do they offer a warranty on their work?

What happens if there are issues with a job the company did for you? Will they fix the problems at no cost to you? Will there be a warranty on the parts they supply? If there are warranties, you will want to know the terms and conditions attached to them. Warranties should be gotten in writing.

How will they estimate the cost of the job?

Will they provide a free estimate? How do they arrive at that estimate? Will you get a quote over the phone, or should you expect them to do a home inspection? You want your plumber to have the right information about a problem before quoting on the job. Do not work with plumbers who attempt to give you a quote over the phone.

How do they charge?

Do they use hourly rates or flat rates? With flat rates, you know what you are paying for a job, but hourly rates can be unpredictable. You also want to see the contract and payment terms. Do they expect you to pay upfront, halfway through the job, or after the work is completed?

In need of the best plumbing services in Chicago? Contact us at 773-599-9181 or by form below!

How to Drain a Water Heater Correctly

How to Drain a Water Heater Correctly

Issues with your water heater are one of those home maintenance problems you never want to deal with. A malfunctioning water heater will bring many of the simple everyday things you take for granted in your home to a screeching halt.

When the water heater fails to work as it should or doesn’t work at all, taking a bath will go from being a pleasant experience to an ordeal you must endure. As Nest Finders Property Management points out, lack of warm water for household chores like washing clothes and dishes will make your life a lot harder than it needs to be.

But why do water heaters fail in the first place?

Most water heater issues are the result of not taking the small steps you need to ensure the health and efficient function of your water heater. One of the steps for keeping the water heater in your home in good working order is draining the water heater.

Why do you need to drain your water heater?

The reason is the water from the municipal supply looks clean to your eyes, but actually contains quantities of dissolved and suspended materials. Although these substances inside your water are harmless to you, they can present a problem for your water heater.

That is because as the water travels through the water heater and is heated to the evaporation point, its suspended or dissolved content is deposited inside the unit. These become sediment that lines the sides or bottom of the water heater and impedes its performance.

How does sediment affect the performance of your water heater?

  • The water heater has to work harder to heat water because the deposit creates an insulating layer between the water inside the unit and the heating element.

  • There is a significantly higher risk of corrosion, leaks, and blockages. The lifespan of your water heater may be severely shortened by these sediments.

  • Due to the increased possibility of overheating, the risk of the tank exploding is higher. Chances that someone will get burned by excessively hot water also increase.

  • You will pay more for energy because your water heater will use up more energy. Furthermore, you will need to replace the water heater sooner than you expect.

How to drain your water heater

To prevent sediment buildup inside the tank of your water heater, you should flush the tank once every year. This simple measure will make it easier to avoid water heater repair emergencies and also help your water heater last longer. Here is how to flush a water heater.

  1. Turn off the unit’s heat source. If this is an electric water heater, you need to unplug the heater or find the breaker and flip the switch to the off position. For gas water heaters, turn them off by changing the temperature settings to vacation or pilot mode.

  2. Find the water supply valve – the inlet pipe that supplies cold water to the unit – and shut it off. To do this, turn the valve until it is at a 90-degree angle to the pipe.

  3. Find the drain spigot at the base of your water heater and connect a garden hose to it. The other end of the hose should be outside your home, where you want to release the water.

  4. To let air into the tank, open the pressure relief valve on the side of the water heater. This will allow the water in the tank to flow out when you open the drain valve.

  5. Turn the valve of the drain spigot at the bottom of the water heater. You should feel the water flowing through the connected garden hose; note that the water will be hot (do not let children or pets play in the water).

  6. Wait until the water stops flowing. Your tank is empty but not yet clean; the flow of water was not forceful enough to agitate the sediments at the bottom of the tank. Open the cold water valve to release a spray of water into the tank for 15-20 seconds.

  7. Repeat step six several times (3 – 4 times) until there are no more particles in the water. To check if the water is clean, run some of it into a clean (preferably white) bucket and inspect for particles.

  8. Close the drain valve, along with the pressure relief valve, and open the cold water valve to fill the water heater tank. Close the cold water valve and open both the pressure relief valve and drain valve to empty the tank one last time.

  9. Close the drain valve and disconnect the garden hose. Close the pressure relief valve on the side of the tank and open the cold water valve. If it is a gas water heater, return the unit’s heat settings to the previous position. For electric water heaters, plug the unit back into the wall or flip the breaker to the on position.

How to Turn Off the Water for Plumbing Repairs

How to Turn off the Water for Plumbing Repairs

There are several reasons why you may want to turn off the water supply to your home. Maybe you are about to leave town and don’t want to leave the water on. Or you are testing the shut-off valve. Or, the most common reason, is that you have a plumbing emergency.

Whatever your reason for wanting to turn off your water, you have to actually know where the shut-off valve is and how to use it before you can stop the water supply to your house, says Stringer Management. This post shows you how to turn off your home’s water supply before doing plumbing repairs.

There are two ways to turn off the water supply to your home. You may shut off the supply to the entire home by turning it off at the mains. Or you can cut off the supply to specific appliances or your water heater. The right method depends on your reason for shutting the water supply.

How to turn off the water at the main shut-off valve

The first step is to locate the main shut-off valve for your home. Its location depends on the age of your home and the climate in your location. You may have to look around your property to find it. The three places where you will often find the shut-off valve are:

Inside the house

Areas inside the home where the shut-off valve is often located are the basement, garage, laundry room, or exterior wall facing the street. In many homes, it is near the water heater. A shut-off valve inside the basement will often be at eye level. If it is on the main floor of the home, expect it to be positioned lower.

Outside on an exterior wall

If the climate in your region is relatively warm, the shut-off valve could be located outside the house. You will often find it sticking from the lower part of an exterior wall. Start your search in the areas near the outdoor faucet.

Close to the street

In some areas, the shut-off valve will be located in the same place as your water meter. You may find a fixture near the street and below the ground, with two shut-off valves on opposite sides. The street-facing valve is for the city’s use. The other valve facing your home is what you are looking for. Do not touch the valve until you verify that it is indeed the main shut-off valve for your home.

Now that you have found the main shut-off valve for your property the next step is to actually turn it off. How you turn off the valve depends on the type of valve your home has. The most common types are:

Ball valves: These have a lever handle. When the valve is open the handle lines up with the pipe. To shut it off you turn the lever until it is at a 90-degree angle to the pipe.

Gate valves: These have a circular handle. To shut this off turn the circular handle in a clockwise direction until it stops moving.

Note that since your main shut-off valve is rarely used, it might be stiff, and you will need to exert effort to get the valve handle or lever to move. Also, some homes have branch valves near the main shut-off valve; these let you cut off the water supply to selected areas of the home.

After shutting the valve, drain any water inside your home’s supply pipes. To do this, open the lowest faucet in the house as well as the highest one. This step helps you avoid flooding when you eventually start your repairs. You may also use this step to verify that the water supply is indeed terminated.

a water valve shut off.

When the valve is open the handle lines up with the pipe. To shut it off you turn the lever until it is at a 90-degree angle to the pipe.

How to turn off the water supply at the water heater

If your hot water pipe is leaking or you want to repair your water heater, there is no need to shut off the water supply to the entire home. You can easily prevent cold water from getting into the water heater or hot water from leaving the water heater in the home.

Your water heater has two valves; a blue one to control cold water supply and a red one to control hot water. If your hot water pipe is leaking and you need to fix it, shut the red valve. On the other hand, if you are trying to repair or replace a water heater, close the blue valve.

How to turn off the water supply for appliances

If the problem is with a dishwasher, washing machine, or any water-utilizing appliance, you can turn off the water supply to that appliance alone. You may also shut down the water supply to a specific plumbing fixture in the home, dripping faucet, or running toilet.

For sinks, toilets, and showers, you will usually find their shut-off valve close to the fixture. Dishwashers, washing machines, and refrigerators will have the shut-off valve mounted on a water supply tube or a wall close to the appliance.